One of the connectors in Power Automate is the Excel connector.In this post I will take a look at the Add a Row action.
Flow Excel Connectors
Table of Contents
Actually there are 3 connectors as I described in one of my past posts. I’ve seen many people complain that the connector doesn’t work for them and the Excel file becomes unusable or it is locked resulting in the flow failing.
I’m assuming that I have an empty Excel file. My flow therefore first needs to create a table so that I can add rows to my table. However I only want to create a table if the table doesn’t already exist.
Get WordPress stats
To make a bit more sense I tried to get the stats of my SharePains blog by getting my statistics on an hourly basis and then adding details to an excel table.

Add a row into a table
Then I will add the data to my table using the Add a row into a table action. This should look something like shown below.

That is all easy, but I still need to create the table.
Finding tables in Excel
If I only have one table in my excel file you could simply run a Get tables and if any tables are returned then get on with the row addition with the above mentioned action. But I might have multiple tables. So I’m going to do some additional checks.
I will start by initializing a variable.

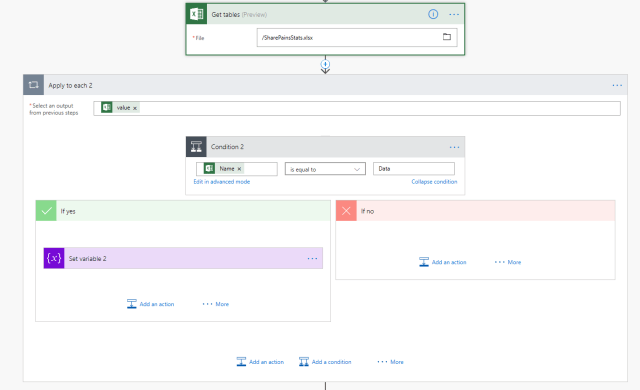
Then I will get all the tables in my excel file and when I find a table with the name Data then I’m setting the FoundData variable to true

Now that we now that the data is found or not we can create the table in the excel file with all the right columns only if the table doesn’t yet exist.

In the past I would simply use the run actions and accept that the Create table action would fail after the first run of my flow. By configuring the the run actions I would then ignore the failure and continue. This approach however resulted in locked files and problems with the stability of my flow. With the approach of only creating a table when it is needed, my flow has become a lot more stable.
This has now resulted in an excel file giving me the website stats on an hourly basis:


Hi Pieter,
did you add all the data with just one “Add a row into a table” call? And if so, this is no longer possible, or is it?
I’ve tried this with two columns in an excel sheet and two arrays with values, but there was added just one row with the complete content of the array in a cell. 🙁
Regards,
Ingrid
Hi Ingrid,
I’m only adding one row at a time and could add multiple rows within loops
Ah, ok. I read about the Rest Api where this should be possible and thought there is a way to tackle this with the connector.
Because I have the problem, that my excel file is not updated correctly when I’m using the “Add a row into a table” in a “Apply to each” loop. Sometimes the connector gives a retry message (without error) and those entries appear twice in the sheet. Do you know this error or have an idea what goes wrong?
Thanks,
Ingrid
Yes, you could use the MS Graph API.
To read files I’ve gone through the steps described in this post:
https://sharepains.com/2018/12/03/microsoft-flow-import-list-data-from-an-excel-spreadsheet-into-sharepoint-lists/
Using the following call you could add a table row:
https://docs.microsoft.com/en-us/graph/api/resources/excel?view=graph-rest-1.0#add-a-table-row
Thanks Pieter. Just for information: I’ve found the issue with the wrong row entries. The problem was not the excel connector, it was due to the concurrency control setting of the “Apply to each” loop. It was enabled an degree of parallelism was set to 50. Unbelievable, that took me a whole day’s work. 🙁