

Have you tried to update Excel from a Power Automate flow? This can be slow if you do this the wrong way.
Write to Excel files
In the past I write articles on reading large Excel files but so far I didn’t look at writing to excel files.
Like with the super fast reading of excel files using Microsoft Graph, you can do the same for data updates.
Json data example
I’m going to start by building a large json list of records. It doesn’t matter too much how complex the data is, the number of records is going to be the most limiting part that I’m going to look at within this post.
I’m starting by creating a Compose action and set its content to the following json.
[
  {
    "Title": "Title 1",
    "Description": "Description 1"
  },
  {
    "Title": "Title 2",
    "Description": "Description 2"
  },
  ...
  {
    "Title": "Title 19",
    "Description": "Description 19"
  },
  {
    "Title": "Title 20",
    "Description": "Description 20"
  }
]
This will result in json data displayed in the compose

Example Excel file
No that I have my json, I will prepare an Excel file in SharePoint with a table:
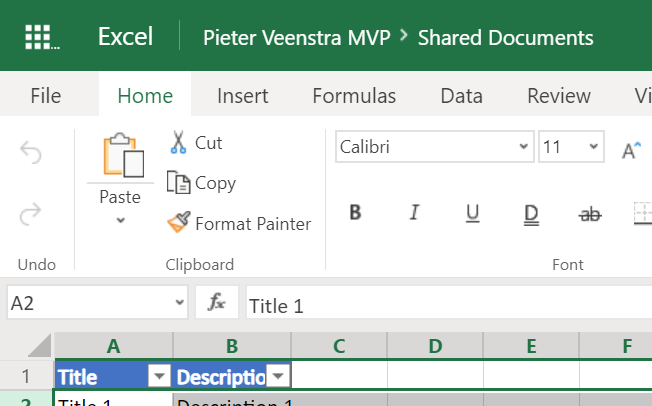
Now that all the prerequisites are in place it’s time to complete my flow.
The slow way to update Excel
With my 20 records of json I could create a row in my Excel using a flow like this:

Each of the Add a row into a table action will take about 1 second to run. In total the flow is running 27 seconds!
Imagine if you have 1000 json records. This would take over 15 minutes!
Adding rows the fast way
It might be useful to read the Add rows to excel documentation for MS Graph first.
So we will need to call the following end point from a flow.
https://graph.microsoft.com/v1.0/me/drive/root:/demo.xlsx:/workbook/tables/Table1/rows/addWithin flow you will need to configure your Ms Graph Authentication. For this I would like to refer to other posts.
Now comes the tricky bit! how do we create the new records. And this is not obvious!
you will need to create a body for the request that looks like this:
{"index":1,
 "values": [
  ["Title 1","Description 1"],
  ["Title 2","Description 2"]
  ]
}
Ok, this is not pretty!
The graph call will now simply add the data to the table and it will not verify your column names. All you will need to supply is the data and that will be copied into your table.
Converting the Json to json
To convert my json I will configure my flow to use select action
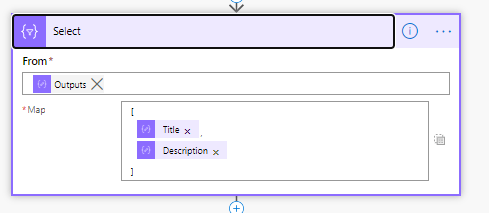
In the above action I used the following code to get the right pieces of information for each record in my select mapping.
[
  @{item()['Title']},
  @{item()['Description']}
]
This now generates the follow json for me in exactly 0 seconds

This gives me the exact right format in one action. This should be a very speedy flow as I hardly need any actions at all. Remember the 15 minute wait for the flow to complete? This flow will run in seconds!
The call to the Graph API
Now all i need to do is configure the HTTP request to update my excel file in SharePoint. For the details on the MS Graph call please have a look at the graph api calls for writing to excel files.

The URI in the above is set to the below details.
https://graph.microsoft.com/v1.0/sites/pieterveenstramvp.sharepoint.com/lists/a8bcb564-c8f1-4c88-9324-bb872bd6bbfc/drive/root:/book1.xlsx:/workbook/tables/Table1/rows/addYou can recognize the site url, the list id and the name of the excel file that I’ve used. Also there is a table with the name Table1 in my excel file. This is the table that I’m going to update with my Power Automate flow.
Then finally the body is set to to the following code. This is where I’m taking the output that I generated with the select action used within the http request.
{
  "index": 1,
  "values": @{body('Select')}
}
Now when I run the flow it completes within 2 seconds. A lot better than the original 15 minutes!
More Power Automate Excel post
https://sharepains.com/2020/08/04/populate-excel-template-power-automate/
Pieter Veenstra

Is your business still running on paper trails, sprawling Excel files, or ageing Access databases? There's a better way — and I can show you exactly what it looks like. I'm the Technical Director of Vantage 365, a Microsoft solutions consultancy working with clients across the UK, the Netherlands, and worldwide. For over 30 years I've been turning messy, manual business processes into clean, automated systems that save time, reduce errors, and give teams the visibility they need to make better decisions. SharePains is not just any blog run by a Microsoft MVP. Have you ever used Try-Catch in Power Automate? The original post about Try-Catch in Power Automate can still be found on this site, https://sharepains.com/2018/02/07/try-catch-finally-in-power-automate-flow/ Or have you ever used the Pieter’s method to avoid variables and speed up your flows? https://sharepains.com/2020/03/11/pieters-method-for-advanced-in-flows/ You can contact me using contact@sharepains.com


Thank you for this blog….it was a great help for me!
You are welcome
Hi Pieter, Great article. I think you have a typo in the article:
“You can recognize the site url, the list id and the name of the excel file that I’ve used. Also there is a table with the name Table1 in my excel file. This is the table that I’m going to update with my Power Sutomate flow.”
Power Sutomate -> Power Automate
Thanks. I fixed the typo in the post.
Can you please explain why you have the list id in URI?
The list id often works better than querying for the list within the end point. I’ve seen the querying of the list more often fail.
I mean why do you include list in the URI where the data is coming from the Compose action? I’m sorry, I followed the same approach but still not getting the positive result. My scenario is almost the same. I have data from the SQL, 6000+ rows, everything is fine but it is taking a lot to add a row in excel if I use normal Apply to each action. Been banging my head for a week now. I might be missing something that I can’t figure out.
Hi, If you open a chat in this site I will try to help. If I don’t immediately respond just try again.. I can try and see if I can help you make this work.
Apply to each is definitely not the way to go with 6000 rows.
For anyone who came here looking for update actions, not just add row actions, check out the new Batch Update Excel template:
https://powerusers.microsoft.com/t5/Power-Automate-Cookbook/Batch-Update-Excel/td-p/1624706
I am adding rows to a table that has calculated cells using the Graph API, and in the calculated ones I put null values as all the columns of the table must be completed in the request. Is there some way to add only some of the columns and not all of them, because the formulas are not applied to those columns, and I have to select the first row for the formula to be applied to the others.
Potentially create multiple ranges might help in that case.
You do have to include all data within the rectangular shape of the cell within a range or ranges.